Montag, 15. August 2022

#116 Wald | Into the wood


 Heute startet unsere neue Challenge bei bastel-traum.blogspot.com
Our new challenge starts today at bastel-traum.blogspot.com


Dieses Mal geht es rund um  das Thema WALD. Was auch immer Dich jetzt gerade anspricht vom Motiv, ist frei wählbar, ob eine CAS Karte oder auch eine aufwendige Karte... alles ist erlaubt. Überrasche uns von Deiner Seite mit einer Idee. 

This time it's all about the theme INTO THE WOODS. Whatever appeals to you right now from the motif, is freely selectable, whether a CAS card or even an elaborate card ... everything is allowed. Surprise us from your side with an idea. 


Hier ist meine Inspiration für Dich.
Here is my inspiration for you.

Mama Elephant | Bear Hugs
Mama Elephant | Cub Cuddles


Lass Dich auch von den Designern auf unseren Blog überraschen, was sie tolles gezaubert haben. 
Let yourself be surprised by the designers on our blog, what they have created. 


Danke vielmals dass Du meinen Blog besucht hast und für Deinen lieben Kommentar. 
Thank you so much for visiting my blog and for your lovely comment. 


Ute

Sonntag, 14. August 2022

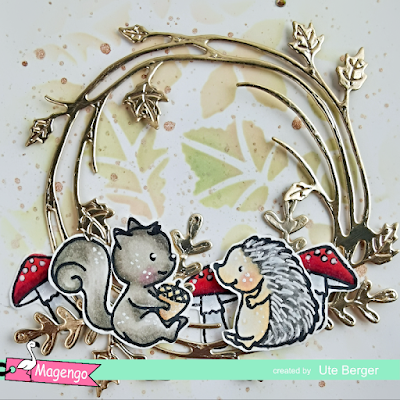
Magengo Design | Happy Fall

  Hallo ich bin's wieder. Dieses Mal zeige ich Euch wieder eine neue Inspiration.
Hello it's me again. This time I show you again a new inspiration.

Nun möchte ich Euch ein wenig darüber berichten, wie ich diese Karte gebastelt habe. Die Produkte von Magengo Design werde ich am Ende des Beitrages verlinken. Zuerst habe ich mit Distress Oxide Inks (tattered rose | bundled sage) und der Schablone mit den Blättern den Hintergrund gestaltet. Noch ein paar Farbspritzer. Danach habe ich gedacht, es wäre sehr schön, wenn ich eine Karte mit einem deutschen Sentiment wähle. Hallöchen... passt sehr gut, wenn man zwei Images wählt. So habe ich das Eichhörnchen und den kleinen Igel gewählt. Ebenfalls wollte ich noch einen Akzent setzen und habe mich für einen Kranz entschieden, welcher von Stampin Up ist. Alles zusammensetzen, Sentiment drauf und fertig ist die Karte, naja... ich habe doch noch ein paar Strasssteinchen aufgesetzt. Am Rand der Karte habe ich noch einen Streifen gemustertes Papier geklebt.
Now I would like to tell you a little about how I made this card.  I will link to the Magengo Design products at the end of the post.First I used Distress Oxide Inks (tattered rose | bundled sage) and the stencil with the leaves to create the background. A few more splashes of color. After that I thought it would be very nice if I choose a card with a German sentiment. Hi there... fits very well if you choose two images. So I picked the squirrel and the little hedgehog. Likewise, I still wanted to set an accent and have chosen a wreath, which is from Stampin Up. Put everything together, sentiment on it and the card is ready, well... I still have a few rhinestones put on. At the edge of the card I have still glued a strip of patterned paper. 


Products | Produkte


Hier geht es zum Shop. Einfach auf das Bild klicken.
This way to the store. Just click on the image.


Vielen Dank für Deinen Besuch auf dem Blog. Hinterlasse doch einen Kommentar mit Wünschen, welches Produkt du gerne sehen möchtest, wo Du eine Idee benötigst oder einfach wie dir die Karte gefallen hat. Wünsche Dir eine tolle Zeit, bis zum nächsten Mal. 
Thank you for visiting the blog. Leave a comment with wishes, which product you would like to see, where you need an idea or simply how you liked the card. Wish you a great time, see you next time. 


Samstag, 13. August 2022

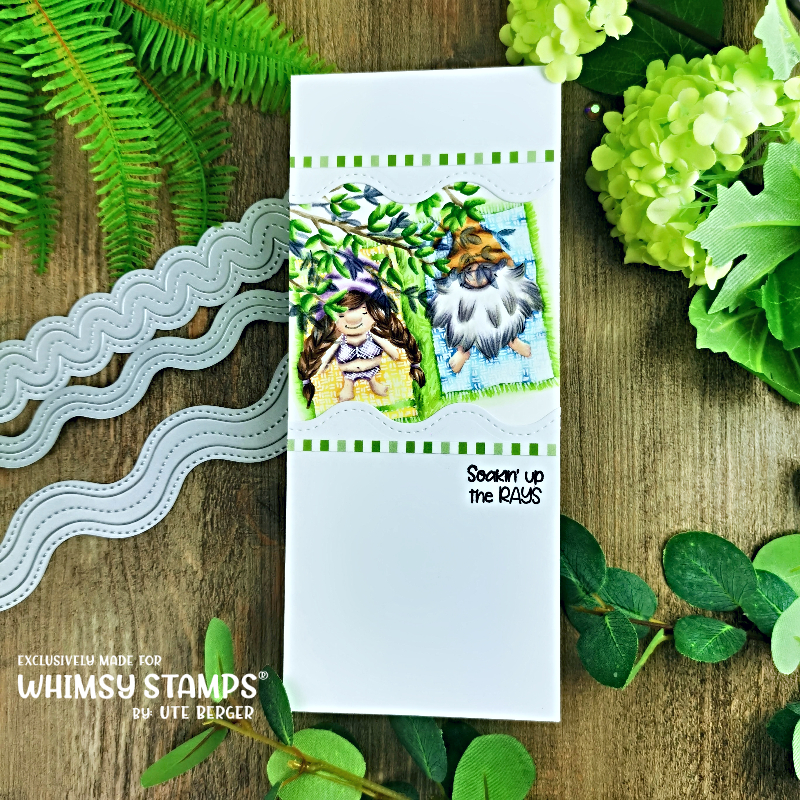
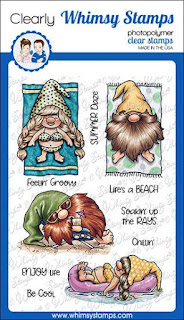
Whimsy Stamps | Slimline Wavy Edges | Soakin up the Rays


Welcome to my blog.  It is time for a new inspiration.
Herzlich willkommen auf meinen Blog. Es ist Zeit für eine neue Inspiration.


How I made this card?

The two cute gnomes, lay in the sun to tan, but also have a small shady part. They are well protected and have no sunburn yet either. This little scene I have framed something, at least above and below. Then I used some patterned paper to add an accent to the card before stamping a sentiment to finish.

Wie habe ich diese Karte gemacht?

Die zwei süssen Gnome, liegen in der Sonne, um sich zu bräunen, aber haben auch einen kleinen schattigen Anteil. Sie sind gut geschützt und haben auch noch keinen Sonnenbrand. Diese kleine Szene habe ich etwas eingerahmt, zumindest oben und unten. Dann habe ich noch etwas gemustertes Papier verwendet, um einen Akzent auf die Karte zu bringen, bevor ich zum Schluss ein Sentiment gestempelt habe.


Products | Produkte

I link here all products, which I have used.
Ich verlinke hier alle Produkte, welche ich gebraucht habe.


Thanks for visit my blog and for your lovely comment. 
Danke vielmals, dass Du mich auf dem Blog besucht hast und für Deinen lieben Kommentar. 


Samstag, 6. August 2022

Whimsy Stamps | Fish Fancy |Happy Birthday


Welcome to my blog.  It is time for a new inspiration.
Herzlich willkommen auf meinen Blog. Es ist Zeit für eine neue Inspiration.


How I made this card?

This time I'm showing you a layer card because it gives you a little more depth and makes it look like 3D. 

You need for it 
- Card base, thicker white paper cut to 4 x11inch or even 10.1 x28cm and
fold at 5.5inch or 14cm
- now prepare again from the same paper 3 rectangles
in the size 4x5.5 inch or 10.1x14cm
-products I added at the end of the post, also link to the shop
-Distress Oxide Ink, your choice

Instruction
Use Wavy Nested Dies to insert the holes in the card. I punched the top one first, then the middle one and finally the bottom one. Using Distress Oxide Ink the bottom with Salty Ocean. Then I took the bottom rectangle, with the smallest hole and inked that one with Mermaid Lagoon and then the middle one with Tumbled Glass. Finally, I went over it with Shaded Lilac here or there and smudged it a bit. The top one remains white. With a water bottle I sprayed on the colored parts and took up the excess water again, with a paper towel.  After I put the papers to dry on the side and punched the plants. Colored them to choice with the same inks, adding a few color blends.  I chose two more fish to swim in the ocean and colored them with Copics. Again, I make sure to use the same colors. So I have a nice monochrome card. But this is optional and everyone can design it the way he likes it. Now to the structure of the card. I have everything laid out the way it suits me best. But before I attach everything, I still used the stencil at the bottom to add a few fish in the distance. Putting the card together takes a bit of dexterity. To make everything straight, you can also use a folding board, the edge is very good to work straight. Now use spacer glue to apply each layer including the plants. The fish I have glued in only at the end. I still decided to add a few bubbles on the card and also added a gradient here, as well as on the sentiment. 


Wie habe ich diese Karte gemacht?

Dieses Mal zeige ich Euch eine Layer Karte, weil man so etwas mehr Tiefe gewinnt und es wie 3 D wirkt. 

Man braucht dafür: 
- Kartenbasis, dickeres weisses Papier auf 4 x11Inch oder auch 10.1 x28cm
 zuschneiden und bei 5.5Inch oder 14cm falzen
- nun noch einmal vom gleichen Papier 3 Rechtecke
in der Grösse 4x5.5 Inch oder 10.1x14cm vorbereiten
-Produkte habe ich am Schluss verlinkt 
-Distress Oxide Ink Deiner Wahl 

Anleitung
Wavy Nested Dies benutzen, um  die Löcher in die Karte einzufügen. Dabei habe ich erst das oberste, dann das mittlere und zum Schluss das untere gestanzt. Mit Distress Oxide Ink den Boden mit Salty Ocean. Dann habe ich das untere Rechteck genommen, mit dem kleinsten Loch und dieses mit Mermaid Lagoon gefärbt und dann das mittlere mit Tumbled Glass. Zum Schluss bin ich mit dem Shaded Lilac noch hier oder da darüber gegangen und habe etwas verwischt. Das oberste bleibt weiss. Mit einer Wasserflasche habe ich auf die gefärbten Teile gespritzt und das überschüssige Wasser wieder aufgenommen, mit einem Papiertuch.  Nachdem habe ich die Papiere zum Trocknen auf die Seite gelegt und die Pflanzen gestanzt. Diese nach Wahl mit den selben Inks gefärbt und dabei ein paar Farbverläufe eingebaut.  Noch zwei Fische ausgesucht, welche im Ozean schwimmen sollen. und diese mit Copics coloriert. Auch hier achte ich auf die selben Farben. So habe ich eine schöne monochrome Karte. Aber dies ist optional und jeder kann es so gestalten, wie es ihm gefällt. Nun zum Aufbau der Karte. Ich habe mir alles so zurecht gelegt, wie es mir am besten zusagt. Bevor ich aber alles befestige, habe ich am Boden noch den Stencil benutzt, um ein paar Fische in der Ferne hinzuzufügen. Die Karte zusammensetzen, braucht ein bisschen Fingerspitzengefühl. Damit alles gerade wird, kann man auch ein Falzbrett benutzen, die Kante eignet sich sehr gut, um gerade zu arbeiten. Mit Abstandsklebern wird nun jede Schicht inkl. der Pflanzen aufgebracht. Die Fische habe ich erst zum Schluss reingeklebt. Ich habe mich noch entschieden, ein  paar Blasen auf der Karte anzubringen und habe auch hier einen Farbverlauf eingebaut, sowie auf dem Sentiment. 


Products | Produkte

I link here all products, which I have used.
Ich verlinke hier alle Produkte, welche ich gebraucht habe.


Thanks for visit my blog and for your lovely comment. 
Danke vielmals, dass Du mich auf dem Blog besucht hast und für Deinen lieben Kommentar. 


Mittwoch, 3. August 2022

Whimsy Stamps | Life is Cool | Relax

 Welcome to my blog.  It is time for a new inspiration.
Herzlich willkommen auf meinen Blog. Es ist Zeit für eine neue Inspiration.


How I made this card?

AI have a shaker card for you this time. How I made this, I will briefly describe. 
First I made the pool bottom by stamping a blank card with the wood pattern background. Then smeared it a little with Distress Oxide Ink to make this look a little more like a wood look. Now I die cut the pool and then added a frame. The pool edge I glued on the card, then I put foil on the back so that the inside wouldn't get lost. The background or pool bottom I colored with some blue Distress Oxide Ink and then with spacer adhesives I put the card together. Only decorate, for this the bear on the air mattress fits very well. Still a few plants and the card takes shape. Finally, I have still attached the word Relax, because it fits very well, as well as a few round Enamels, as accents. 

Wie habe ich diese Karte gemacht?

Ich habe dieses Mal eine Shaker Karte für Euch. Wie ich diese gemacht habe, werde ich kurz beschreiben. 
Zuerst habe ich den Pool Boden gemacht, indem ich eine blanke Karte mit dem Holzmuster Hintergrund gestempelt habe. Danach noch ein wenig mit Distress Oxide Ink verschmiert, damit dies ein wenig mehr nach einer Holzoptik aussieht. Nun habe ich den Pool ausgestanzt und dann noch einen Rahmen. Den Poolrand habe ich aufgeklebt auf die Karte, dann habe ich auf der Rückseite Folie angebracht, damit der Inhalt nicht verloren geht. Den Hintergrund oder Pool Boden habe ich mit etwas blauen Distress Oxide Ink gefärbt und mit Abstandsklebern habe ich dann die Karte zusammen gesetzt. Nur noch dekorieren, dafür passt der Bär auf der Luftmatratze sehr gut. Noch ein paar Pflanzen und die Karte nimmt Gestalt an. Zum Schluss habe ich noch das Wort Relax angebracht, da es sehr gut passt, sowie noch ein paar runde Enamels, als Akzente. 

Products | Produkte

I link here all products, which I have used.
Ich verlinke hier alle Produkte, welche ich gebraucht habe.


Thanks for visit my blog and for your lovely comment. 
Danke vielmals, dass Du mich auf dem Blog besucht hast und für Deinen lieben Kommentar.