Welcome to my blog. It is time for a new inspiration.
Herzlich willkommen auf meinen Blog. Es ist Zeit für eine neue Inspiration.
How I made this card?
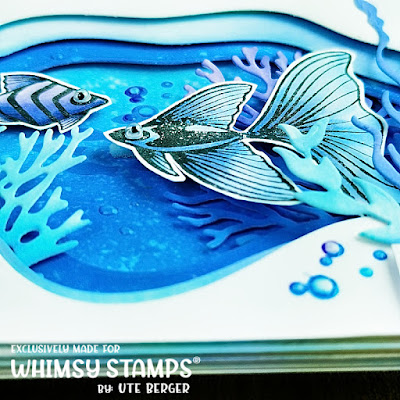
This time I'm showing you a layer card because it gives you a little more depth and makes it look like 3D.
You need for it
- Card base, thicker white paper cut to 4 x11inch or even 10.1 x28cm and
fold at 5.5inch or 14cm
fold at 5.5inch or 14cm
- now prepare again from the same paper 3 rectangles
in the size 4x5.5 inch or 10.1x14cm
-products I added at the end of the post, also link to the shop
-Distress Oxide Ink, your choice
in the size 4x5.5 inch or 10.1x14cm
-products I added at the end of the post, also link to the shop
-Distress Oxide Ink, your choice
Instruction
Use Wavy Nested Dies to insert the holes in the card. I punched the top one first, then the middle one and finally the bottom one. Using Distress Oxide Ink the bottom with Salty Ocean. Then I took the bottom rectangle, with the smallest hole and inked that one with Mermaid Lagoon and then the middle one with Tumbled Glass. Finally, I went over it with Shaded Lilac here or there and smudged it a bit. The top one remains white. With a water bottle I sprayed on the colored parts and took up the excess water again, with a paper towel. After I put the papers to dry on the side and punched the plants. Colored them to choice with the same inks, adding a few color blends. I chose two more fish to swim in the ocean and colored them with Copics. Again, I make sure to use the same colors. So I have a nice monochrome card. But this is optional and everyone can design it the way he likes it. Now to the structure of the card. I have everything laid out the way it suits me best. But before I attach everything, I still used the stencil at the bottom to add a few fish in the distance. Putting the card together takes a bit of dexterity. To make everything straight, you can also use a folding board, the edge is very good to work straight. Now use spacer glue to apply each layer including the plants. The fish I have glued in only at the end. I still decided to add a few bubbles on the card and also added a gradient here, as well as on the sentiment.
Wie habe ich diese Karte gemacht?
Dieses Mal zeige ich Euch eine Layer Karte, weil man so etwas mehr Tiefe gewinnt und es wie 3 D wirkt.
Man braucht dafür:
- Kartenbasis, dickeres weisses Papier auf 4 x11Inch oder auch 10.1 x28cm
zuschneiden und bei 5.5Inch oder 14cm falzen
zuschneiden und bei 5.5Inch oder 14cm falzen
- nun noch einmal vom gleichen Papier 3 Rechtecke
in der Grösse 4x5.5 Inch oder 10.1x14cm vorbereiten
-Produkte habe ich am Schluss verlinkt
-Distress Oxide Ink Deiner Wahl
in der Grösse 4x5.5 Inch oder 10.1x14cm vorbereiten
-Produkte habe ich am Schluss verlinkt
-Distress Oxide Ink Deiner Wahl
Anleitung
Wavy Nested Dies benutzen, um die Löcher in die Karte einzufügen. Dabei habe ich erst das oberste, dann das mittlere und zum Schluss das untere gestanzt. Mit Distress Oxide Ink den Boden mit Salty Ocean. Dann habe ich das untere Rechteck genommen, mit dem kleinsten Loch und dieses mit Mermaid Lagoon gefärbt und dann das mittlere mit Tumbled Glass. Zum Schluss bin ich mit dem Shaded Lilac noch hier oder da darüber gegangen und habe etwas verwischt. Das oberste bleibt weiss. Mit einer Wasserflasche habe ich auf die gefärbten Teile gespritzt und das überschüssige Wasser wieder aufgenommen, mit einem Papiertuch. Nachdem habe ich die Papiere zum Trocknen auf die Seite gelegt und die Pflanzen gestanzt. Diese nach Wahl mit den selben Inks gefärbt und dabei ein paar Farbverläufe eingebaut. Noch zwei Fische ausgesucht, welche im Ozean schwimmen sollen. und diese mit Copics coloriert. Auch hier achte ich auf die selben Farben. So habe ich eine schöne monochrome Karte. Aber dies ist optional und jeder kann es so gestalten, wie es ihm gefällt. Nun zum Aufbau der Karte. Ich habe mir alles so zurecht gelegt, wie es mir am besten zusagt. Bevor ich aber alles befestige, habe ich am Boden noch den Stencil benutzt, um ein paar Fische in der Ferne hinzuzufügen. Die Karte zusammensetzen, braucht ein bisschen Fingerspitzengefühl. Damit alles gerade wird, kann man auch ein Falzbrett benutzen, die Kante eignet sich sehr gut, um gerade zu arbeiten. Mit Abstandsklebern wird nun jede Schicht inkl. der Pflanzen aufgebracht. Die Fische habe ich erst zum Schluss reingeklebt. Ich habe mich noch entschieden, ein paar Blasen auf der Karte anzubringen und habe auch hier einen Farbverlauf eingebaut, sowie auf dem Sentiment.
Products | Produkte
I link here all products, which I have used.
Ich verlinke hier alle Produkte, welche ich gebraucht habe.
Ich verlinke hier alle Produkte, welche ich gebraucht habe.
Thanks for visit my blog and for your lovely comment.
Danke vielmals, dass Du mich auf dem Blog besucht hast und für Deinen lieben Kommentar.


Keine Kommentare:
Kommentar veröffentlichen