Montag, 14. November 2022

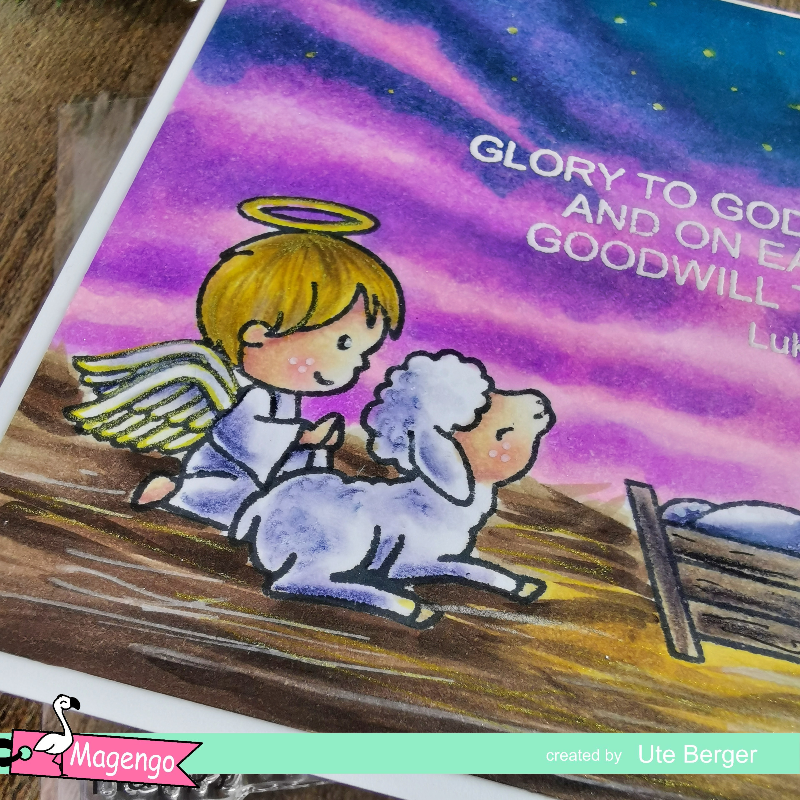
Magengo Designs | Joy to the World


 Hallo ich bin's wieder. Dieses Mal zeige ich Euch wieder eine neue Inspiration.
Hello it's me again. This time I show you again a new inspiration.

Nun möchte ich Euch ein wenig darüber berichten, wie ich diese Karte gebastelt habe. Die Produkte von Magengo Design werde ich am Ende des Beitrages verlinken. 
Ich habe mich für einen Hintergrund von Sandy Allnock entschieden, welchen sie in ihren Kursen zeigt. Etwas gewagter Himmel für mich und ich war mir nicht ganz sicher, wie dieser herauskommen wird. Im Kurs nutzt sie eine ganz eigene Methode und ich dachte, ok, mal sehen, was passiert. Die Stempel hatte ich auf ein blankes, weisses Alkoholfreundliches Papier aufgestempelt und dazu die Masking Technik genutzt. Nachdem der Hintergrund gemalt war, habe ich die Figuren ausgemalt. Noch ein wenig Gold im Stern, den kleineren Sternen, den Heiligenschein und ein paar Details hier und da... Zum Schluss habe ich mit weiss den Text embosst. 

Now I would like to tell you a little about how I made this card.  I will link to the Magengo Design products at the end of the post.
I chose a background by Sandy Allnock, which she shows in her classes. A bit of a bold sky for me and I wasn't quite sure how this one would come out. She uses a very unique method in the course and I thought, ok, let's see what happens. I had stamped the stamps onto a blank white alcohol friendly paper using the masking technique. After the background was painted, I colored in the figures. Still a little gold in the star, the smaller stars, the halo and a few details here and there.... Finally, I have embossed with white the text. 


Products | Produkte


Hier geht es zum Shop. Einfach auf das Bild klicken.
This way to the store. Just click on the image.


Vielen Dank für Deinen Besuch auf dem Blog. Hinterlasse doch einen Kommentar mit Wünschen, welches Produkt du gerne sehen möchtest, wo Du eine Idee benötigst oder einfach wie dir die Karte gefallen hat. Wünsche Dir eine tolle Zeit, bis zum nächsten Mal. 
Thank you for visiting the blog. Leave a comment with wishes, which product you would like to see, where you need an idea or simply how you liked the card. Wish you a great time, see you next time. 


Sonntag, 13. November 2022

Whimsy Stamps | Bah HumPUG


Welcome to my blog.  It is time for a new inspiration.
Herzlich willkommen auf meinen Blog. Es ist Zeit für eine neue Inspiration.


What a brilliant stamp set. So funny and the looks of the dog, so good....  First I stamped and colored everything images of the stamp set. Had to smile over and over again about this clumsy dog and the sentiments are also really brilliant. So two cards were made from the set. Which one I made first, I don't even remember, but I had a lot of fun designing them. Under the respective picture of the card, I will briefly explain how you can make them. Have fun trying them out. 
Was für ein geniales Stempelset. So lustig und die Blicke des Hundes, so gut...  Zuerst habe ich alles Bilder des Stempelsets gestempelt und coloriert. Musste immer wieder über diesen tolpatschigen Hund schmunzeln und die Sentiments sind auch richtig genial. 
So sind aus dem Set zwei Karten entstanden. Welche ich zuerst gemacht habe, weiss ich gar nicht mehr, aber es hat mir viel Spass gemacht, die zu entwerfen. Unter dem jeweiligen Bild der Karte werde ich kurz erklären, wie man diese nachbasteln kann. Viel Spass beim Ausprobieren. 


How I made this card?

Here I have as a base a white slimline card. On it I cut a white cardstock to create a small scene. I distressed the background with blue and sprayed water on it. Then I used a border die cut to cut out the snow and glued it to the background. Now I punched out the tree, colored it and glued it to the card, using spacer glue on the bottom of the tree so that the card looks 3 dimentional. Next to the tree I glued on the gifts, one with a little distance, a broken ball. Do you know that, because you make everything ready to decorate the tree, maybe you sing and then the ball flies down and is broken ... Have also been annoyed with myself.... (lol), therefore fits the sentiment for me very well :)

Wie habe ich diese Karte gemacht?

Hier habe ich als Basis eine weisse Slimline Karte. Darauf habe ich einen weissen Cardstock zurechtgeschnitten, um eine kleine Szene zu gestalten. Den Hintergrund habe ich mit blau distressend und Wasser darauf verspritzt. Dann habe ich mit einer Borderstanzen den Schnee ausgeschnitten und auf den Hintergrund geklebt. Nun habe ich den Baum ausgestanzt, ausgemalt und auf die Karte geklebt, dabei verwende ich Abstandskleber an der unteren Baumseite, so dass die Karte 3 Dimentional wirkt. Neben den Baum habe ich die Geschenke aufgeklebt, wobei ich eins mit ein wenig Abstand aufgeklebt habe, eine kaputte Kugel. Kennst Du das auch, da macht man alles parat, um den Baum zu schmücken, vielleicht singt man dabei und dann fliegt die Kugel runter und ist kaputt.. Hab mich auch schon über mich geärgert... (lol), darum passt das Sentiment für mich sehr gut :)


How I made this card?

For this card I have chosen a square variant. A wooden wall and on it hangs the wreath, well, there also seems to have gone wrong. But the card is quite simple to recreate.

Wie habe ich diese Karte gemacht?

Für diese Karte habe ich eine quadratische Variante gewählt. Eine Holzwand und daran hängt der Kranz, naja, da scheint auch etwas schief gegangen zu sein. Aber die Karte ist ganz einfach zum nachbasteln.

Products | Produkte

I link here all products, which I have used.
Ich verlinke hier alle Produkte, welche ich gebraucht habe.


Thanks for visit my blog and for your lovely comment. 
Danke vielmals, dass Du mich auf dem Blog besucht hast und für Deinen lieben Kommentar. 


Mittwoch, 9. November 2022

Kreativbunt Magazin | Whimsy Stamps


Welcome to my blog.  Kreativbunt is a very beautiful craft magazine for the German-speaking region and they give the opportunity to send in pictures based on sketches. I sent in 3 pictures and two of them found a place in the paper. I am so excited. 
Herzlich willkommen auf meinen Blog. Kreativbunt ist ein sehr schönes Bastelmagazin für die deutschsprachige Region und sie geben die Möglichkeit anhand von Sketchen Bilder einzusenden. Ich habe 3 Bilder eingeschickt und zwei davon haben einen Platz in der Zeitung gefunden. Wow, ich freu mich so :)


I send the following cards: 
Ich habe die folgenden Karten gesandt:


two cards made it into the magazine:
zwei Karten schafften den Weg ins Magazine: 


Products | Produkte

I link here all products, which I have used.
Ich verlinke hier alle Produkte, welche ich gebraucht habe.


Thanks for visit my blog and for your lovely comment. 
Danke vielmals, dass Du mich auf dem Blog besucht hast und für Deinen lieben Kommentar. 


Sonntag, 6. November 2022

Whimsy Stamps | Yeti for Christmas


Welcome to my blog.  It is time for a new inspiration.
Herzlich willkommen auf meinen Blog. Es ist Zeit für eine neue Inspiration.


How I made this card?

This time I show a slimline card. For this I have chosen a light blue card blank. On it I have a white cardstock at the edge colored with a Copic, so that this fits together better, as a contrast color. With the punch I have now punched the base for the scene. and colored with Distress. Then splashed over it with water, blue, gold and silver. So it glitters beautifully, unfortunately not to see in the photo. You can use the Border dies to create a little bit of landscape. Whimsy Stamps also has quite brilliant trees, which upgrade the card. To make it fit the basic shape, I die cut 2 white cardstock and then created the snow hills. Put it all together and the scene is ready. Finally, I added a sentiment and the Gems, and discreetly added a little glitter.

Wie habe ich diese Karte gemacht?

Dieses Mal zeige ich eine Slimlinekarte. Dafür habe ich mich für einen hellblauen Kartenrohling entschieden. Darauf habe ich eine weissen Cardstock am Rand mit einem Copic gefärbt, damit dies besser zusammenpasst, als Kontrastfarbe. Mit der Stanze habe ich nun die Basis für die Szene gestanzt. und mit Distress gefärbt. Dann mit Wasser, blau, Gold und Silber darüber gespritzt. So glitzert es wunderschön, leider auf dem Foto nicht zu sehen. Mit den Border Stanzen kann man ein wenig Landschaft gestalten. Whimsy Stamps hat auch ganz geniale Bäume, welche die Karte aufwerten. Damit es zur Grundform passt, habe ich 2 weisse Cardstock ausgestanzt und dann die Schneehügel erstellt. Alles zusammenstellen und die Szene ist fertig. Zum Schluss habe ich noch ein Sentiment und die Gems angebracht, sowie dezent ein wenig Glitzer.

Products | Produkte

I link here all products, which I have used.
Ich verlinke hier alle Produkte, welche ich gebraucht habe.


Thanks for visit my blog and for your lovely comment. 
Danke vielmals, dass Du mich auf dem Blog besucht hast und für Deinen lieben Kommentar. 


Donnerstag, 3. November 2022

Whimsy Stamps | Magic Winter


Welcome to my blog.  It is time for a new inspiration.
Herzlich willkommen auf meinen Blog. Es ist Zeit für eine neue Inspiration.


How I made this card?

First I die cut the card blanks. Then I stamped on the snowman and masked it. Now I covered the bottom and colored the sky with blue Distress Ink. Splashed a little water over it and a little gold. Removed the masking and colored the snowman with Copics and stamped another sentiment. Finally, I adhered this to the card blank. Still a few beads glued on and ready is the first card of the month of November. 

Wie habe ich diese Karte gemacht?

Als erstes habe ich die Kartenrohlinge ausgestanzt. Dann habe ich den Schneemann aufgestempelt und maskiert. Nun habe ich den Boden abgedeckt und den Himmel mit blauen Distress Ink gefärbt. Ein wenig Wasser darüber gespritzt und ein wenig Gold. Das Masking entfernt und den Schneemann mit Copics ausgemalt und noch ein Sentiment gestempelt. Zum Schluss habe ich dies auf den Kartenrohling aufgeklebt. Noch ein paar Perlen aufgeklebt und fertig ist die erste Karte vom Monat November. 

Products | Produkte

I link here all products, which I have used.
Ich verlinke hier alle Produkte, welche ich gebraucht habe.


Thanks for visit my blog and for your lovely comment. 
Danke vielmals, dass Du mich auf dem Blog besucht hast und für Deinen lieben Kommentar.