Welcome to my blog. It is time for a new inspiration.
It’s Denise Lynn’s birthday, the owner of Whimsy Stamps, and we want to celebrate. Come hop with us as our designers share birthday cards for Denise. One lucky winner will win a $100 gift certificate to Whimsy Stamps and a second winner will win a $50 gift certificate to This Calls for Confetti.. Hop to Instagram will be on Instagram
Herzlich willkommen auf meinen Blog. Es ist Zeit für eine neue Inspiration.
Denise Lynn, die Inhaberin von Whimsy Stamps, hat Geburtstag, und das wollen wir feiern. Kommen spiel mit, wenn wir unsere Designer Geburtstagskarten für Denise teilen. Ein glücklicher Gewinner gewinnt einen 100-Dollar-Gutschein für Whimsy Stamps und ein zweiter Gewinner einen 50-Dollar-Gutschein für This Calls for Confetti. Der Hop findet auf Instagram statt.
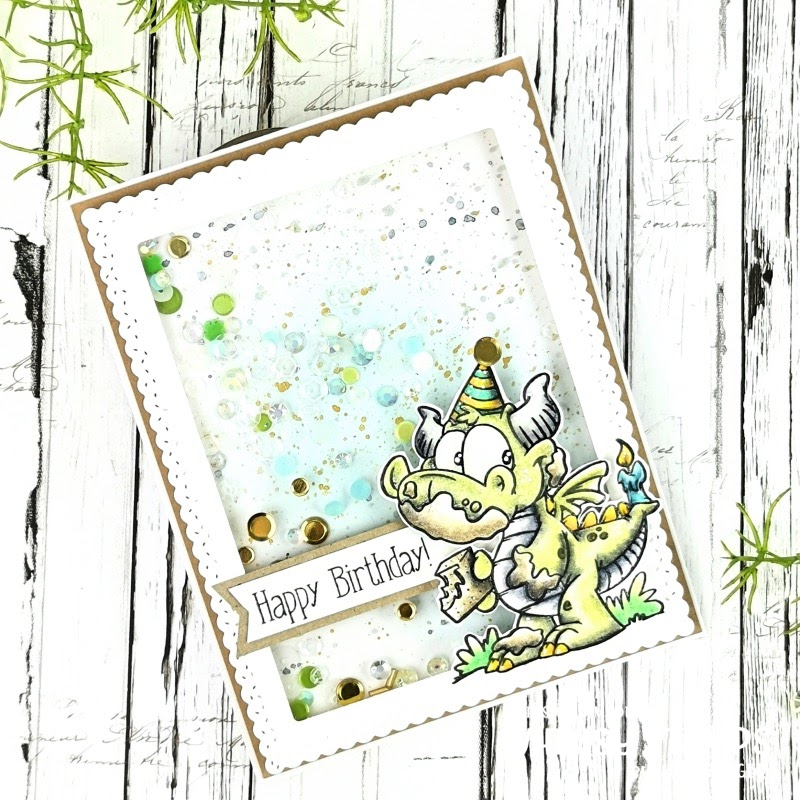
How I made this card?
First I made a frame so I could then attach the foil so the confetti wouldn't fall out. Then I made a background and spiced it up a bit. Now the double-sided adhesive foam strip, confettis purely and cover (my background paper) on it. My shaker element is ready. Now quickly finish the rest of the card. For this I took a white card as a base, under the shaker element kraft paper, then also a piece in the inside, on top of a white card stock. Now I stamped the motif, colored and glued to a short sentiment on the front, with a little spacer glue. In the inside I still stamped a saying from the stamp set and the card is ready.
Wie habe ich diese Karte gemacht?
Zuerst habe ich einen Rahmen gemacht, damit ich dann die Folie anbringen konnte, damit die Konfettis nicht herausfallen. Dann habe ich einen Hintergrund gewerkelt und ein wenig aufgepeppt. Nun den doppelseitig klebenden Schaumstoffstreifen, Konfettis rein und Deckel (mein Hintergrundpapier) drauf. Mein Shaker Element ist fertig. Nun noch schnell den Rest der Karte fertig werkeln. Dafür habe ich eine weisse Karte als Basis genommen, unter das Shaker Element Kraftpapier, dann auch noch ein Stück in die Innenseite, darauf ein weissen Card stock. Nun habe ich das Motiv abgestempelt, ausgemalt und zu einem kurzen Sentiment auf die Vorderseite geklebt, mit ein wenig Abstandsklebern. In die Innenseite habe ich noch einen Spruch vom Stempelset gestempelt und fertig ist die Karte.
Products | Produkte
I link here all products, which I have used.
Ich verlinke hier alle Produkte, welche ich gebraucht habe.


You made such a gorgeous birthday card for our fabulous boss Ute! Amazing creation hun, love your colouring, the lovely shaker design, all of it! Utterly fab! xoxo
AntwortenLöschen