Posts mit dem Label butterfly werden angezeigt. Alle Posts anzeigen

Mittwoch, 1. September 2021

Whimsy Stamps New Release | Bug Friend


Welcome to RELEASE Week at Whimsy
Herzlich willkommen bei der Whimsy Stamps Veröffentlichung


We have some amazing new stamps to share with you I really hope you will stop by and take look at the NEW RELEASES.
Die neuen Artikel sind nun erhältlich bei Whimsy Stamps... Lass Dich überraschen..


Thanks so much for visiting my blog and I hope you had fun with all the inspiration from the DT. Which is you favorite stamp from the current Release?
Danke vielmals, dass Du meinen Blog besuchst und ich hoffe, dass Du auch noch die anderen Inspirationen der DT Mitglieder bestaunen konntest. Welches ist Dein Lieblingsstempel?


Crafty Hugs Ute
Ganz liebe Bastel Grüsse sendet Ute


Products I used:


Montag, 15. März 2021

#99 Schmetterling | Butterfly

   Heute startet die neue Challenge bei bastel-traum.blogspot.ch

Today starts a new Challenge by bastel-traum.blogspot.ch


Dieses Mal geht es rund um das Thema Schmetterling. Schaue bei uns auf dem Blog vorbei und lasse Dich inspirieren. Jedes DT Mitglied hat sich etwas besonderes einfallen lassen. 
This time is the theme Schmetterling

C.C.Designs | Foxes
Karin Brushmarker Pro


Sentiment is from Simon Says Stamp Set | Tiny Words Faith


. Please feel free to visit our challenge blog to show what the talented DT made for wonderful inspiration for you. 


Thank you for stopping by and for your lovely comment.

Hugs Ute


Samstag, 22. August 2020

Magengo Designs Butterfly Gift Bag

Today I want to show you a little gift bag...


What do you need?

I used follow products for this project:


How to make the gift bag?

I use white card stock for this idea. I open my working space for my Scan and Cut from Brother, Canvasworksspace. There I opened the box die and delete the butterfly, so I have only the gift bag.  I cut it out and save the small little butterfly. I fold and glue the bag together. 
I color the butterfly with my Karin Brushmarker in blue colors and add a glitter pen on this. I decided to add also Glossy Accent for a shiny effect. 

I print out different Geranium flowers and color it with my Alcoholmarker. After than I fuzzy cut it out and glue it on the bag with foam tape. 

I add a German sentiment (from Create a Smile, Krokusse). This means you are a special plant..., this mean something like you are wonderful...

I hope you like this inspiration. Have fun to try this and I can't wait to see you idea.

Crafty Hugs Ute

Samstag, 21. März 2020

Magengo Design No Glue Butterfly Box

I will show you today another fun project. 

This time I use follow product:


This is the Butterfly No Glue Box cutting file.

How do I cut?

My husband have my Silhouette in his store and I have a Brother Scan and Cut machine at home. I wasn't sure, if it works with this machine, but I am so happy that it works perfect. 

I opened the software from Brother, called canvasworkspace.brother.com/. This is a free online tool and I opened the svg file there. I delete at first the butterfly extras, because I want to cut the box first and send this to my machine. I saved the new form on my machine, after than I made the same, but this time I saved the butterfly details. 

Normally I color stamps, so I am not professional for cutting things, like this ;)

How do the box?

It is really easy. I try it first with my card stock paper (white). After cutting I fold all lines. 
I made one mistake to close the box and at last the butterfly, but this doesn't work, it broke. 
Hmmm, another try and voilà a perfect box... 
I am so happy, really it works with no glue... 
Great idea.

My inspirations


this are my first boxes. I cut  the box with white card stock and the butterfly details in gold and blue glitter paper... I glue at first the outside butterfly on my box and after than I used the other paper pieces to fit into the butterfly... 


Hmm, how looks a box with a black glitter outline? So I made this simple box. How will look the butterfly on a card? I use a A2 (US format), paper cut the butterfly details in glitter blue and used the paper pieces from the black one. I glue it on a white card stock and fuzzy cut it out. After than I draw a butterfly body into the mid and glue the fly's only to the body side on the card, the other one are lift a little bit. At last I used a sentiment from my stuff. 


Now I try colorful paper for my next project. 


This time I use a colorful card stock from my stuff and decide to made the butterfly black and white with glitter paper. It looks so wonderful with  the glitter effect.


I have also other butterfly dies at home and this time I decide to use a cutting body for the butterfly not only on the card, rather on the box too.  This time I used my Xron for glue the pieces, this is efficient and clean, as with glue ;)


On the card I use a strip pattern paper, the same like for the box and add a black wooden strip behind, so it's pop a little bit. I use also a sentiment from my stuff.

I hope you will like this cutting file and you can really made a lot of fun boxes or cards. 

Wish you a wonderful crafty weekend.

Hugs Ute


Montag, 17. Februar 2020

Lawn Fawn Butterfly Kisses

A new challenge for playing have started by Lawn Fawnatics :)


the theme is

Bring it back

I am not sure, when I used buttons, ribbon or masking tape the last time, sometimes, but not often I used sequins. So I looked at my stuff and had an idea in my head. 

At first I searched a sketch in the internet and found this one.


I will made a card with the sketch with the heart...


I use a golden tape, pink sequins, whit ribbon and two pink buttons...

How I made the card?

I made in the past the experience, that tape hold not so good,  So I searched the double glue sheet and put it on a white card stock.  I removed the paper from the glue and add the golden tape. After than I die cut the butterflies, with the Lawn Fawn die, called "Layered Butterflies".  I also die cut the body and the background from the butterflies. I colored the background with my Tri Blend from Spectrum Noir and the body with two Spectrum Noir Illustrator Pens ( RB2 / MB1). I glue the butterflies together and add with a black fine liner a smile on each. 

At next I made the shaker. I used the Flippin' Awesome Add On and cut out a black wood paper.  I use acetat for the window, than I add foam tape. I use different pink sequins for shaker and close it with a card stock (white).

Now the card. Here I use an A2 (US format) and use a pink pattern paper from my stuff. I add also a black paper strip and use score tape to hold the white ribbon in place. 

I add the shaker element on the card and place the butterflies on this. I decide my to use a sentiment from Lawn Fawn "Butterfly Kisses".

At last I add two flower buttons on the edge on the shaker element and finished the card.


Hope you like it.


Wish you a great day and send butterfly wishes... 

Freitag, 24. Januar 2020

Hero Arts Monthly Kit January 2020

Wow, just wow... what for a fabulous set this month... I was surprised this month. Wonderful idea...

I saw that this kit was really fast sold out. 

full packed with love, great sentiments and dies... also glitter embossing and paper.

I made a card in no time, I used the text message in the middle and cut out the butterfly three times.


I used the ink from the last kit (Reactive Ink palette). A wonderful turquoise, blue and violett. I used water and it is a smooth color. On the background I used embossing powder the glitter pink and an antique version. I also use the Thank you sentiment with the fishtail die... work perfect. 

I love this set and think I will use this often.

Hugs Ute

Freitag, 10. Juni 2016

Challenge Art by Miran #60

Welcome to an other Challenge #60 by Art by Miran  the 
theme is also "Anything goes"
This time I made a with the amazing digitalstamp "Rora and Butterfly"  
I picked a few Prismacolor pencils and coloured the image... I love the painting with them, They have great colorpigments and they are smooth...  and the result is mostly stunning....


After finish I used Dies and flowers, to finish my card... I decied me, to put one sentiment into the card later...
 ....please hop to the challengeblog to see more stunning DT inspiration.
Thanks for visiting me :)

Mittwoch, 15. Mai 2013

Challenge Geburtstag

Geburtstag komme immer wieder, zeigen uns an, wie alt wir werden... Vor allem beliebt bei den Kleinen, denn diese können es schon gar nicht erwarten, dass der nächste Geburtstag kommt, dann heisst es nämlich GESCHENKE...
Da wir alle gerne etwas bekommen, sei es einfach Zuwendung, freundliche Worte oder etwas Materielles, legen wir noch einen Zusatzgewinn in den Lostopf.... Möchtest Du gerne wissen, was Du gewinnen kannst, dann klicke einfach hier

www.bastel-traum.ch


Ich freue mich schon auf die tollen Ideen von Euch...


Ich tat mich zu Beginn diesen eigentlich einfachen Themas sehr schwer, vor allem, weil ich eigentlich keine Zeit hatte. Zunächst bastelte ich eine eher langweilige Karte, doch dann kam mir eine Idee und ruckzuck war diese Karte entstanden. Ich staune immer wieder, über die Farbintensität der Copics...


 Dies ist ein Digistamp von Saturated Canary. Coloriert habe ich diesen mit Copics... Den Hintergrund habe ich mit Wolken Stanzen (als Maske), Distress Ink und Copics verschönert. Verschiedenes Papier und eine Spitze bilden den Sketch welchen ich aus verschiedenen Inspirationen zusammenwürfelte...


Die Rosen habe ich aus roten Buntpapier mit Hilfe der DIE Namics royal Roses gestaltet, etwas Copic-Airbrush und Glitter (extra für den Geburtstag :)
 Die Blätter sind von Sizzix, ebenfalls gefärbt, wie bei den Rosen beschrieben.


Diese kleinen Schmertterlinge habe ich mit einer Whiff of Joy Stanze gemacht, dabei habe ich das ehemals weisse Papier mit Copics Airbrush gefärbt, natürlich mit den selben Farben, wie im Motiv und voilà...


Vielen Dank fürs Vorbeischauen! Ich freue mich über jeden lieb gemeinten Kommentar von Euch.


Diese Karte nimmt teil bei folgender Challenge

Stempelgarten - Geburtstag

Montag, 4. März 2013

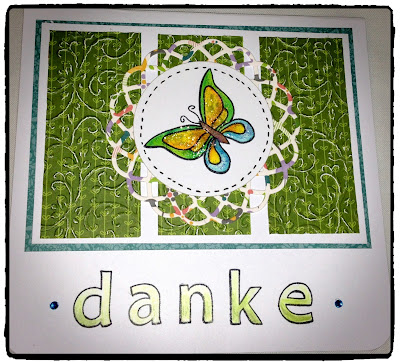
Danke/ thanks

Danke (translation=thanks)


I love the Lawn Fawn products and so I created this card for the next Challenge by Lawnscaping. I say thanks for so lovely stamps and the new dies and our great inspirations and so on...
The theme is "TEXTURE"...


Lawnscaping Challenge


I used/ Ich benutzte dafür: Lawn Fawn Papier (bright side 6x6Inch), Lawn Fawn Stempel (Quinn's ABC und FlutterBy), Stanze und Prägeschablone, Embellishmets, Copic Marker für den Schmertterling, sowie Buntstifte für DANKE... 
Weitere tolle Stempel sind erhältlich bei www.bastel-traum.ch!