Welcome to my blog. It is time for a new inspiration.
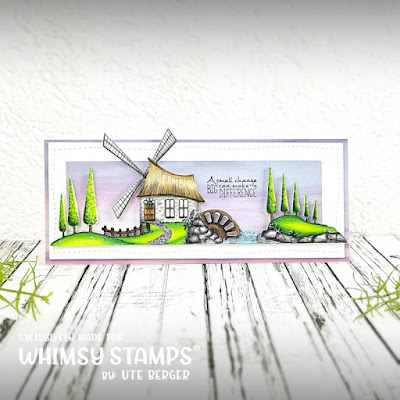
When you use a die cut, the background is blank. This scene was also blank, then I thought about what I wanted to show you and started coloring this, adding details, putting myself in this fairytale scene.... and then this came into being.
Herzlich willkommen auf meinen Blog. Es ist Zeit für eine neue Inspiration.
Wenn man eine Stanze benutzt, ist der Hintergrund leer. Auch diese Szene war leer, dann habe ich mir überlegt, was ich Euch zeigen möchte und habe angefangen dies auszumalen, Details hinzuzufügen, mich in diese märchenhafte Szene versetzt... und dann ist dies entstanden.
How I made this card?
The blank die-cut scene shows me details like the windmill, trees, a water wheel, but also the windows, door, or a path. Before I started coloring them, I fixed the path, the windows and the door to the scene with a tape.
I have first painted the house, it should be a stone look and a thatched roof, the windows I have outlined, so I want to show a frame. After the house I painted the stones, the path, stones on the edge of the water wheel, as well as this and the landscape opposite the wheel. Then I have indicated and expanded the fence, painted the meadow and the trees and finally I painted the water. At the end I brought shadows into the picture, as well as details, such as flowers, grasses...
I thought it would be cool if the landscape had on a distance on the card. Here I have the scene again die cut on double sided, adhesive foam. It wasn't easy to get the scene on there and part of it you can see the foam a little bit. I think it was the hardest part of the card to glue this on correctly. The sky I cut out of the patterned paper. The rest of the paper I used as the background of the card, you can see so the missing rectangle no longer. Above I die cut out a white paper with distance and attached, then the sky, to the scene and another matching sentiment and the card is ready.
No, actually I still used a bit of glossy, on the windows, as well as the water, to add a bit of shine.
Wie habe ich diese Karte gemacht?
Die leere ausgestanzte Szene zeigt mir Details, wie die Windmühle, Bäume, ein Wasserrad, aber auch die Fenster, Türe, oder einen Weg. Bevor ich angefangen habe diese zu Kolorieren, habe ich den Weg, die Fenster und die Türe mit einem Klebestreifen an der Szene fixiert.
Ich habe zuerst das Haus ausgemalt, es sollte eine Steinoptik werden und ein Strohdach, die Fenster habe ich umrandet, damit will ich einen Rahmen zeigen. Nach dem Haus habe ich die Steine gemalt, den Weg, Steine am Rand des Wasserades, sowie dieses und die Landschaft gegenüber des Rades. Danach habe ich den Zaun angedeutet und erweitert, die Wiese und die Bäume gemalt und zum Schluss habe ich das Wasser gemalt. Am Schluss habe ich Schatten in das Bild gebracht, wie auch Details, wie Blumen, Grässer...
Ich habe gedacht, es wäre cool, wenn die Landschaft auf einen Abstand auf der Karte hätte. Hier habe ich die Szene nochmals ausgestanzt auf doppelseitig, klebenden Schaumstoff. Es war nicht ganz einfach die Szene darauf zu bringen und zum Teil sieht man den Schaumstoff ein wenig. Ich glaube es war das schwierigste an der Karte dies korrekt aufzukleben. Den Himmel habe ich ausgeschnitten aus dem gemusterten Papier. Den Rest des Papiers habe ich als Hintergrund der Karte verwendet, man sieht ja so das fehlende Rechteck nicht mehr. Darüber habe ich mit Abstand ein weisses Papier ausgestanzt und befestigt, dann der Himmel, die Szene und noch ein passendes Sentiment und fertig ist die Karte.
Nein, eigentlich habe ich noch ein bisschen Glossy verwendet, auf den Fenstern, sowie dem Wasser, um noch ein bisschen Schein hinzuzufügen.
Products | Produkte
I link here all products, which I have used.
Ich verlinke hier alle Produkte, welche ich gebraucht habe.


.jpg)


